Click here to visit Original posting
Protecting your computer with Application Whitelisting
In Windows it is possible to configure two different methods that determine whether an application should be allowed to run. The first method, known as blacklisting, is when you allow all applications to run by default except for those you specifically do not allow. The other, and more secure, method is called whitelisting, which blocks every application from running by default, except for those you explicitly allow.
With the wide distribution of computer ransomware and other malware infections and the high costs of recovering from them, a very strong computer protection method is whitelisting. This allows you to block all programs by default and then setup rules that specifically allow only certain programs to run.
Though easy to setup initially, whitelisting can be burdensome as you will need to add new rules every time you install a new program or want to allow a program to run. Personally, I feel if you are willing to put the time and effort into using whitelisting, the chances of a computer infection damaging your computer becomes minimal.
This tutorial will walk you through setting up whitelisting using Software Restriction Policies so that only specified applications are able to run on your computer. Though this guide will be geared towards individual users, this same approach can be used in the enterprise by pushing these policies to a Windows domain.
How to only allow certain Windows Applications to Run
To get started white listing your applications you need to open the Security Policy Editor, which configures the Local Security Policies for the machine. To do this, click on the Start button and then type secpol.msc into the search field as shown below.
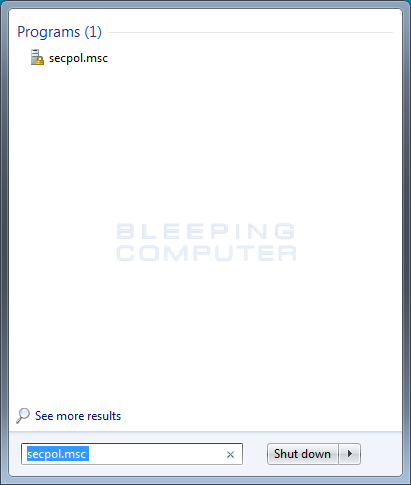
When secpol.msc appears in the search list, click on it to start the Local Security Policy editor.
You should now see the Local Security Policy editor as shown below.
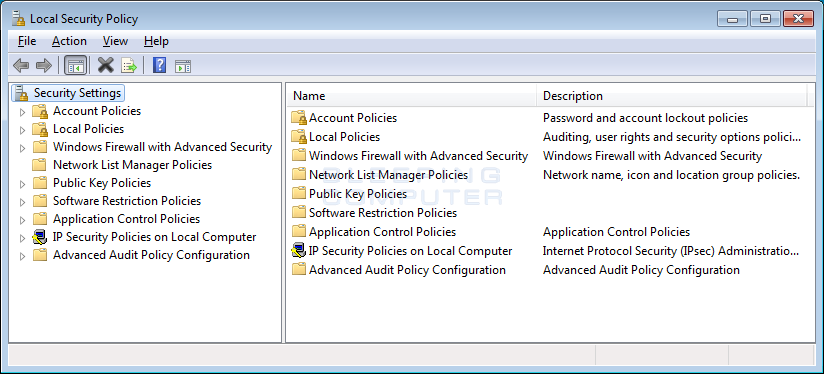
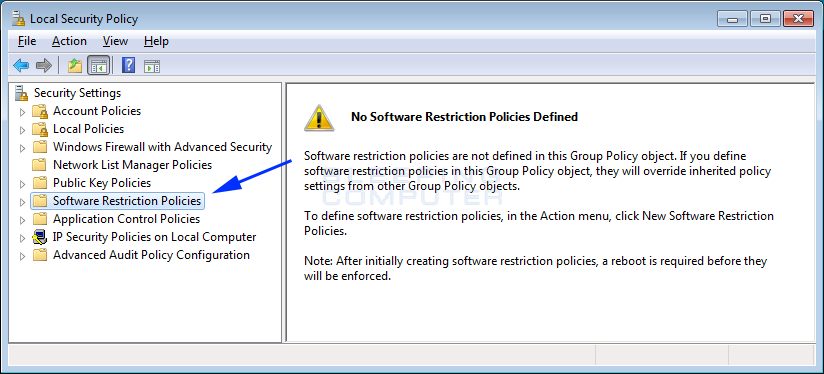
To begin creating our application whitelist, click on the Software Restriction Policies category. If you have never created a software restriction policy in the past, you will see a screen similar to the one below.
To create the new policy, right click on the Software Restriction Policies category and select the New Software Restriction Policies option as shown below.
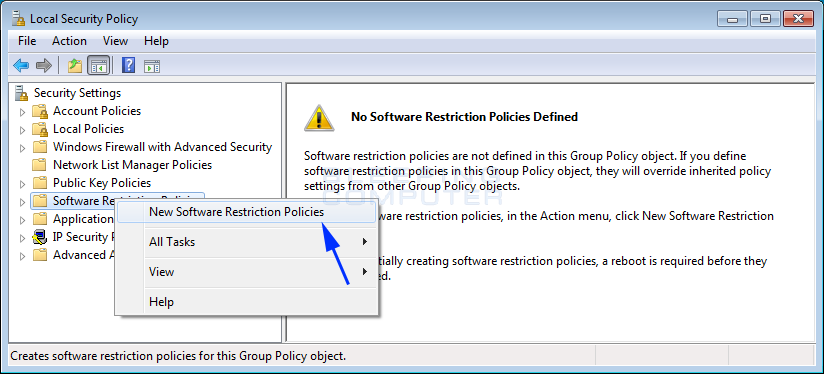
A new Software Restriction Policy will now be created as shown below.
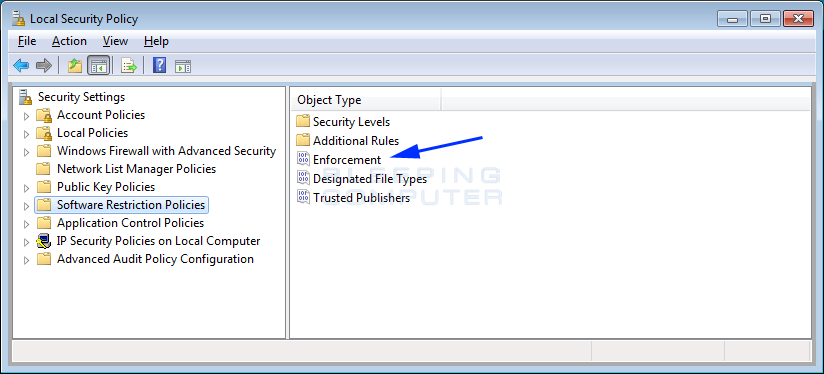
The first thing you need to do is configure the Enforcement section. This section allows us to specify general settings on how these restriction policies will be configured. To get started, click on the Enforcement object type as indicated by the blue arrow above.
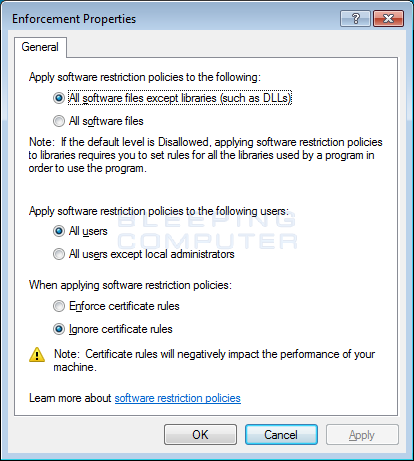
I suggest that you leave the settings like they are for now. This allows you to create a strong policy, without the issues the may be caused by blocking DLLs. When you are done configuring these settings, click on the OK button.
You will now be back at the main Software Restriction Policies window as shown in Figure 5. We now want to configure what file types will be considered an executable and thus blocked. To do this click on the Designated File Types object.
This will open the properties window for the designated file types that will be considered as an executable and therefore blocked by the software restriction policy that you are creating.
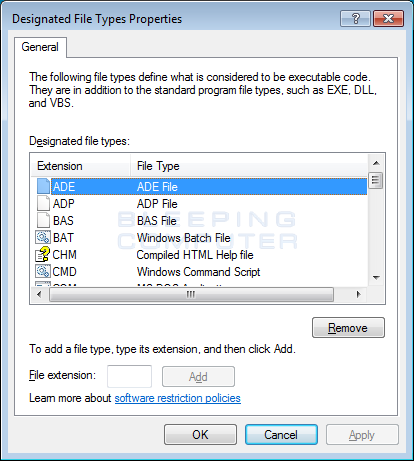
Unfortunately, the above the list is not as exhaustive as you would like and includes an extension that should be removed. First, scroll through the above list of file extensions and remove the LNK extension from the list. To remove the extension, left-click on it once and then click on the Remove button. If you do not remove this extension, then all shortcuts will fail to work after you create our whitelist.
Now you want to add some extra extensions that are known to be used to install malware and ransomware. To add an extension, simply add it to the File Extension field and click on the Add button. When adding an extension, do not include the period. For example, to exclude powershell scripts, you would enter PS1 into the field and click on the Add button.
Please add the following extensions to the designated file types:
| Extensions to add to the File Type List | |
|---|---|
| PS1 | SCT |
| JSE | VBE |
| VBS | WSF |
When you are done adding the above extensions, click on the Apply button and then the OK button.
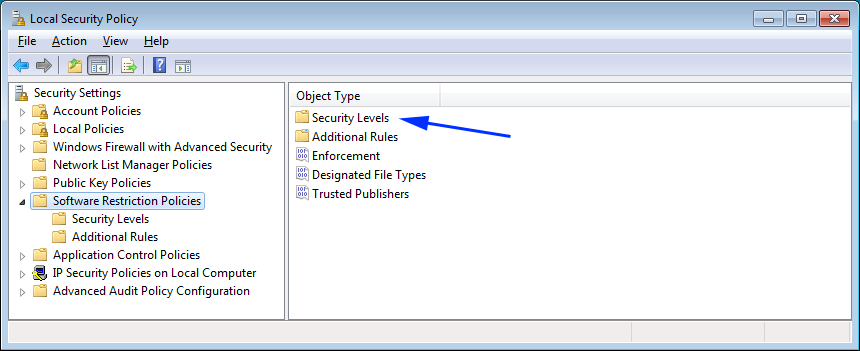
We will now be back at the main Software Restrictions Policy section as shown in Figure 8 below. At this point, you need to configure the default policy that decides whether the file types configured in figure 7 will be automatically blocked or allowed to run. To do this, click on the Security Levels option as indicated by the blue arrow below.
When you double-click on the Security Levels category, you will be brought to the screen below that has three security levels you can apply to your software restriction policies.
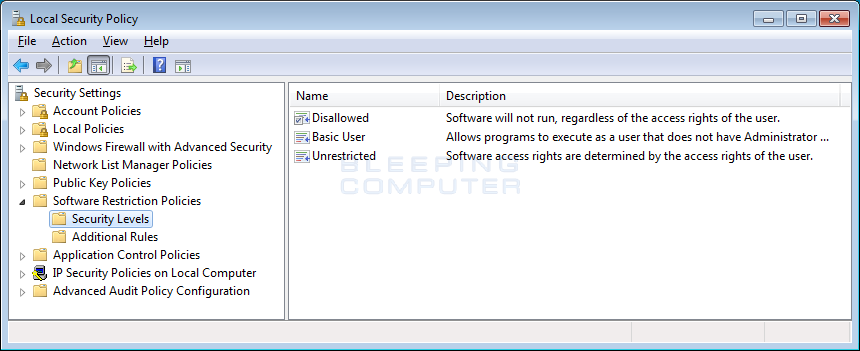
In order to select which level should be used, you need to double-click on the particular level and set it as the default. Below are the descriptions for each type of security level.
Disallowed: All programs, other than those you allow by the rules you will configure, will not be allowed to run regardless of the access rights of the user.
Basic User: All programs should execute as a normal users rather than as an Administrator.
Unrestricted: All programs can be run as normal.
Since you want to block all applications except those that you white list, you want to double-click on the Disallowed button to enter its properties screen as shown below.
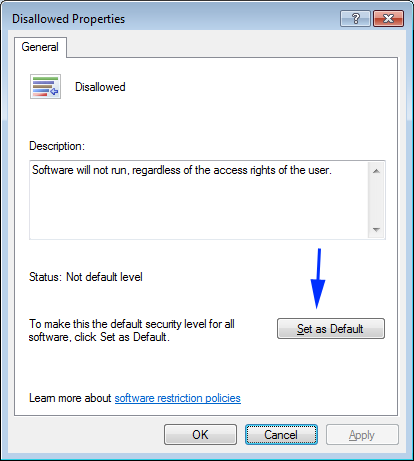
In the above properties screen, to make it so all applications will now be blocked by default, please click on the Set as Default button. Then click on the Apply and OK buttons to exit the properties screen.
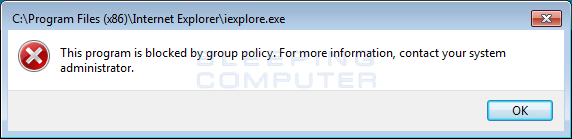
We will now be back at the Security Levels list and almost every program will now be blocked from executing. For example, if you try to run Internet Explorer, you will receive a message stating that "This program is blocked by group policy." as shown below.
Now that you have configured Windows to block all applications from running, you need to configure rules that allow your legitimate applications to run. The next section will explain how to create path rules so that the applications you wish to allow to run are whitelisted.
How to whitelist specific programs using Software Restriction Policies
If you followed the previous steps, Software Restriction Policies are now enabled and blocking all executables except those located under C:\Program Files and C:\Windows. Those two directories are automatically whitelisted by two default rules that are created when you setup Software Restriction Policies.
Obviously, in order to have a properly working machine you need to now allow, or whitelist, other applications. To do this, you need to create additional rules for each folder or application you wish to allow to run. In this tutorial, we are going to add a new Path Rule for the C:\Program Files (x86) folder as that needs to also be whitelisted for 64-bit versions of Windows.
While in the Local Security Policy editor, click on the Additional Rules category under Software Restriction Policies as shown below.
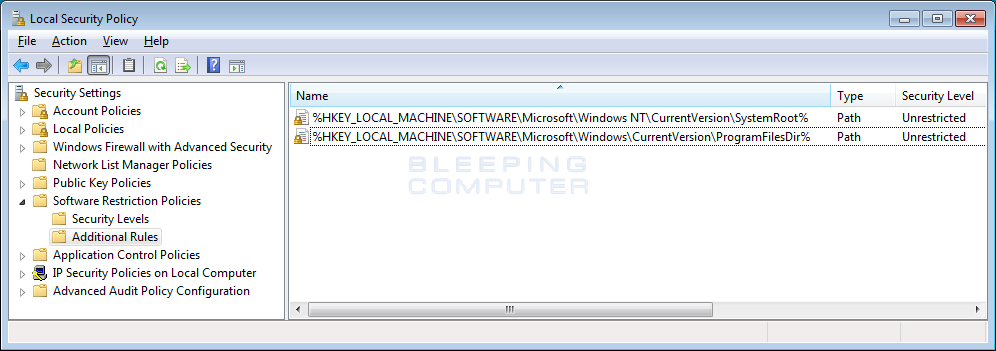
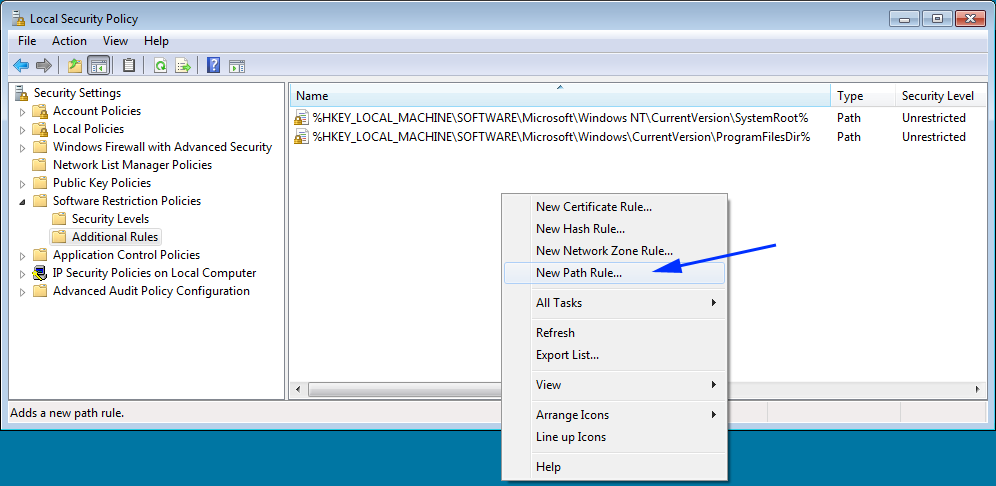
As you can see from above, there are already two default rules configured to allow programs running under C:\Windows and C:\Program Files to run. If you are running a 64 bit version of Windows you now want to add a further rule that will allow programs under the C:\Program Files (x86) folder to run as well.
To do this, right-click on an empty portion of the right pane and click on New Path Rule... as shown below.
This will open up the New Path Rule Properties dialog as shown below.
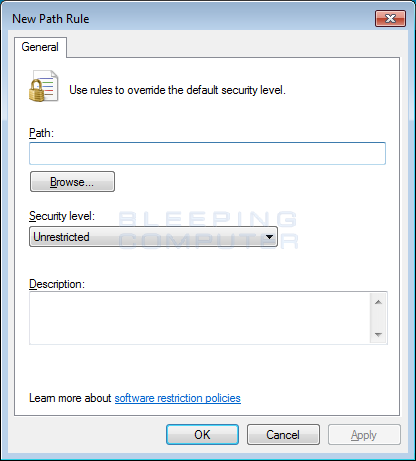
As you want to create a path rule for C:\Program Files (x86), you should enter that path into the Path: field. Then make sure the Security Level is set to Unrestricted, which means the programs in it are allowed to run. If you wish, you can enter a short description explaining what this rule is for in the Description field. When you are finished, the new rule should look like the one below.
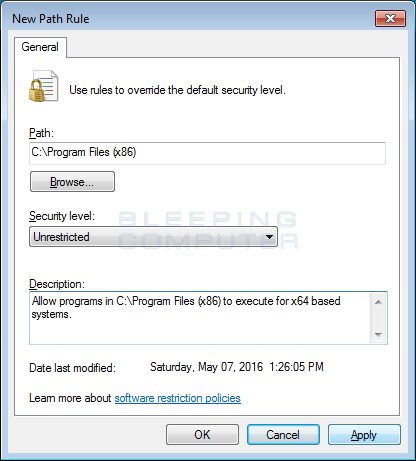
When you are ready to add this rule, click on the Apply and then OK button to make that rule active.
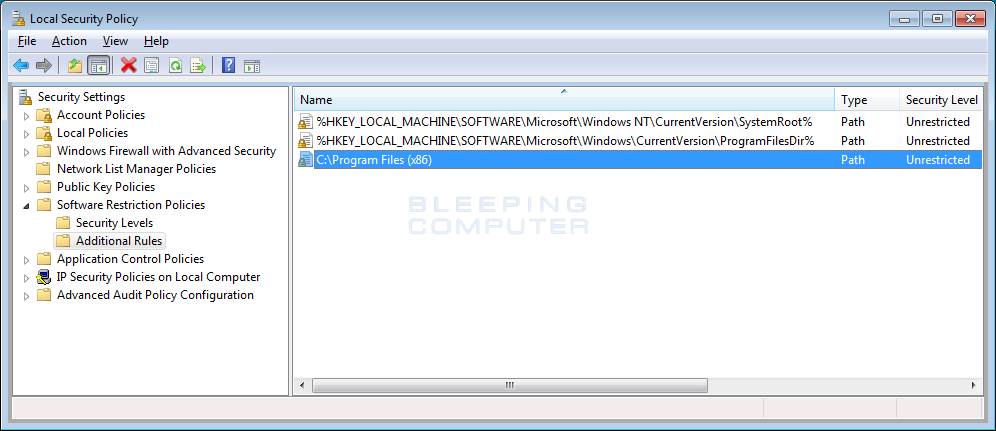
You will now be back at the Rules page and the new C:\Program Files (x86) rule will be listed and programs located in that folder will now be allowed to run.
You now need to make new rules for other programs that you wish to allow to run in Windows. For example, if you play games with Steam, you should follow the steps above to add an unrestricted rule for the C:\Program Files\Steam\ folder.
In the next two sections, I have provided tips and and other types of rules that can be created to whitelist programs. I suggest you read it to take advantage of the full power of Software Restriction Policies.
As always, if you need help with this process, please do not hesitate to ask in our tech support forums.
Tips when creating Path Rules
When adding a path rule that is a folder, it is important to note that any subfolder will also be included in this path rule. That means if you have applications stored in C:\MyApps and create a path rule that folder specifies that folder is unrestricted, then all subfolders will be allowed to run as well. So not only will C:\MyApps\myapp.exe be allowed to run, but also C:\MyApps\games\gameapp.exe is allowed to execute as well.
To make it easier when creating rules, it is also possible to use wild cards to help you specify what programs should be allowed to run. When using wild cards, you can use a question mark (?) to denote a single wildcard character and a asterisk (*) to denote a series of wildcard characters.
For example, if you have a folder of executables that you wish to whitelist, you can do so by using a wildcard path rule like this: C:\MyApps\*.exe. This rule would allow all files that end with .exe to execute, but not allow executables in subfolders to run. You can also use a path rule that specifies a single wildcard character like C:\MyApps\app?.exe. This rule would allow C:\MyApps\app6.exe to run, but not C:\MyApps\app7a.exe to run.
It is also possible to use environment variables when creating path rules. For example, if you wish to allow a folder under all the user profiles, you can specify a rule like %UserProfile%\myfolder\*.exe. This would only allow executables under that particular folder to execute, but would expand %UserProfile% to the correct folder for whoever is logged into the computer.
Last, but not least, if you wish to run executables from a network share, then you need specify the full UNC path in the rule. For example, \\Dev-server\Files.
Other types of Software Restriction Policy Rules
When creating rules, it is also possible to create other rules called Certificate Rules and Hash Rules. These rules are described below.
Certificate Rule: A certificate rule is used to allow any executable to run that is signed by a specific security certificate.
Hash Rule: A hash rule allows you to specify a file that can be run regardless of where it is located. This is done by selecting an executable when creating the rule and certain information will be retrieved by SRP and saved as part of the rule. If any other executables on the computer match the stored file hashed and information, it will be allowed to run.
Note: Microsoft has stated that Certificate Rules could cause performance issues if used, so only use them if absolutely necessary.